But what makes Ginger Garlic Shrimp taste so special is the preparation and the shrimp liqueur. If you like shrimp and wished you could have more of that shrimp flavor, then this recipe is for you.
My Plus 1 loves shrimp, but the shrimp we have eaten in some restaurants was pretty uneventful. She is happy with the shrimp, but I like to serve her better shrimp at home. Here is one of my shrimp recipes.
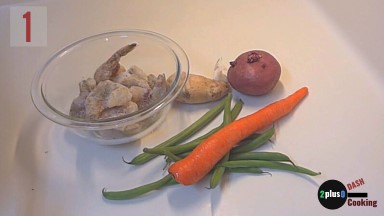
INGREDIENTS (Makes 1) 1 Cup Frozen Shrimp (Uncooked Shell On) 1 Slice Fresh Ginger (1 Tbsp) 2 tsp Garlic (Chopped) <1 Cup Red Potato 2 tsp Butter 1 Tbsp Sun Dried Tomato (Optional) 3 Tbsp Cooking Saki or White Wine 1 tsp Olive Oil 8 Green Beans 1/4 Cup Carrots Salt, Pepper and sugar to taste 1 tsp Crab Fat (Optional) 1 wedge Lemon
How to make Ginger Garlic Shrimp
1. We have frozen shrimp, ginger, garlic, green beans, a carrot, and 1 red potato. Rinse the shrimp in a bowl with cold water to remove the loose shell, then fill the bowl with cold water to cover the shrimp. I am using headless 13/15 frozen un-cooked shrimp. This means there are 13-15 shrimp per pound. My preference is to use head-on shrimp. Head-on shrimp has more flavor opportunities because of the tomalley.
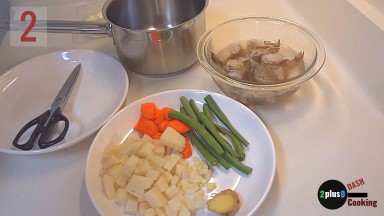
2. Peel and slice the potato, carrots, ginger, garlic, and green beans. Set aside 1 Tbsp sun dried tomato (optional.) Place 1 cup chopped potatoes with 1 cup water into a 2-quart pot (holds 8 cups) with a lid to boil the potatoes. Heat the pot on 1/3 power on a electric stove. A gas stove may produce more heat at the same setting. We will check back on the potatoes in 10 minutes.
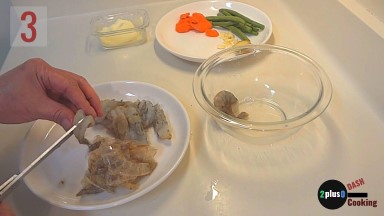
3. Rinse the shrimp again and drain the water from the bowl. Peel the shrimp and save the shell on a preparation plate. Try to keep the shell in one piece. Head-on shrimp requires removing the sharp horn with scissors or any parts that can stab your mouth. A little slit created by cutting the horn will help cook the shrimp thoroughly. It is up to you if you want to remove the legs. The legs are eatable. Set the heads to the side in the refrigerator for pan frying at the end. Use a scissor or a sharp knife and score the shrimp meat on the belly and back. Stagger the cuts on the belly from the top. If the cuts line up from the bottom and the top, then the shrimp can break in half. We do not want that to happen. Gently squeeze and bend the shrimp up and down, and side to side, with a gentle pull. The shrimp will start to elongate. If the shrimp bends, then there is still a section of the shrimp that requires scoring. It is not uncommon to use this technique to double the length of the shrimp.
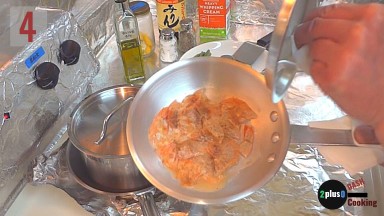
4. Heat a saucepan on 1/3 power on an electric stove. Have a lid ready that is the same size or smaller than the base of the saucepan. The smaller lid will be used later to squeezing the juices from the shrimp shells. If you don’t have a smaller lid, then use a metal spatula to hold and squeeze the shells. Add 1 Tbsp butter to the saucepan. The butter should melt quickly but not burn. Otherwise, reduce the heat. Add 1 tsp garlic and the ginger slice (1 Tbsp). Allow the garlic to brown, then add 1 Tbsp of sun dried tomato (optional,) 2 Tbsp sake or white wine, and 1/4 tsp sugar. Add the shrimp shells and any juices from the preparation plate. Cover the saucepan with a small lid and allow the shrimp shells to simmer.
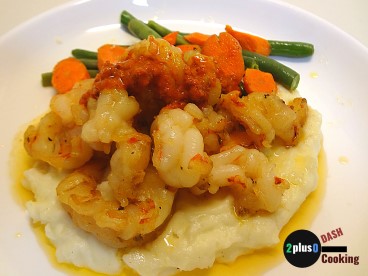
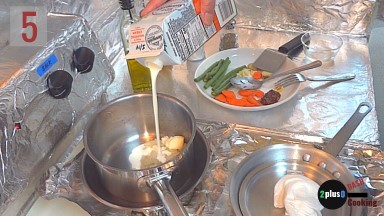
5. Remove the water from the potatoes, and reduce the heat to simmer once the potatoes are tender. Place the potatoes in a wire strainer to drain all water. Return the potatoes to the pot. Add 1 Tbsp butter, 1/8 cup (2 Tbsp) heavy whipping cream, a pinch of salt and pepper. Mash and stir the potatoes while on low heat with a fork. Milk and add 1 Tbsp butter can be used instead of whipping cream. Stir the mashed potatoes frequently until it reaches your desired thickness, then remove from the heat. The mashed potatoes will continue to thicken after it has been removed from the heat. What makes mashed potatoes taste great is the proportion of potatoes to butter and salt. Mashed potatoes with more butter are very luxurious, even when served cold.
6. Heat a saucepan on 1/2 power on an electric stove. Add 1 tsp olive oil and 1 tsp garlic. The garlic will brown quickly. Add carrots, green beans, a pinch of salt, a pinch of pepper, and a pinch of sugar. Sugar is why restaurant sautéed vegetables are tastier than home sauteed vegetables. Saute the vegetables for 2-3 minutes. We want the vegetables to be brightly colored and maintain their fresh snap.
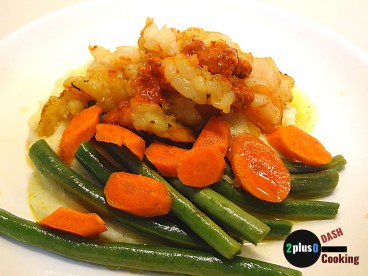
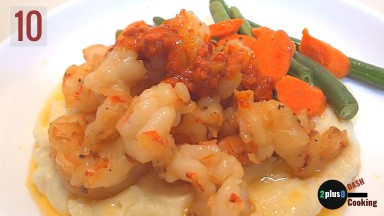
7. Plate the mashed potatoes and vegetables for serving. Turn the heat to 1/2 power on the saucepan with the shrimp shells. The pan should be sizzling hot. Add the prepared shrimp. Saute the shrimp in the hot saucepan, then cover with a lid for 1-2 minutes. Remove the lid. The cooked shrimp should be pale white or pink in color. The shrimp will continue to cook even after it is removed from the heat. Cooked shrimp should have a 145°F (63°C) internal temperature so shrimp can be easily over-cooked. Over-cooked shrimp will be rubbery.
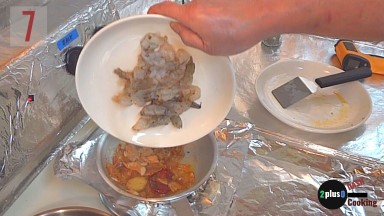
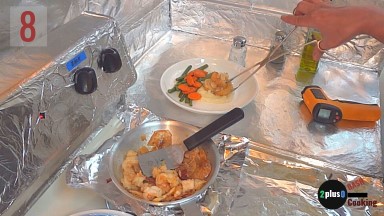
8. Use thongs or two spoons to transfer the shrimp and the sun dried tomato on top of the plated mashed potatoes.
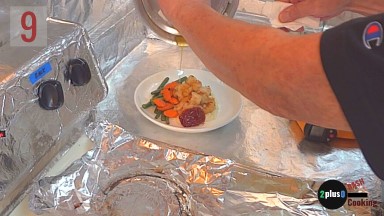
9. Use the small lid or a spatula to squeeze the shrimp juices (shrimp liqueur) from the saucepan on top of the shrimp. The shrimp liqueur will have a nice deep shrimp flavor. If you are using head-on shrimp, then discard the shells from the shrimp pan. Return the pan to 1/2 power on an electric stove. Add 1 Tbsp vegetable oil, 1/4 tsp salt, and 1/4 tsp black pepper to the hot pan. Once the salt and pepper start to react to the heat, then add two shrimp heads. The shrimp heads should immediately begin to fry. Add 3 Tbsp sake or white wine, 1 Tbsp butter, and 1/4 tsp sugar. Cover the pan with a lid so the steam can cook the shrimp heads. After 3 minutes of steaming, remove the lid and sauteeing the shrimp heads until the liquid is nearly gone from the pan and the shrimp heads start frying. The shrimp heads should have a deep orange color and a nice glaze as the liquid evaporates. Place the shrimp head-up in the mashed potatoes.
10. I topped the shrimp with 1 tsp of crab fat just for another layer of flavor and decadence. Crab fat is like ocean butter. If you have ever eaten cracked crab, then you know that crab fat is highly prized. Crab fat can be purchased in a jar at Asian markets. Jarred crab fat has been processed, so it is found on the shelf and not in the refrigerated area. The jarred crab fat has to be refrigerated after opening and can last a long time in the refrigerator due to the fat. The shrimp heads can replace the crab fat. Shrimp heads have tasty tomalley inside that is full of Omega 3 fatty acids. Your dish is now ready to serve with a slice of lemon.
Thanks for stopping by. I hope you enjoy your own Ginger Garlic Shrimp. Remember to share your recipes.