FrugalSpoon

Egg Vodka Apple Pie Dough Crust

Published: December 24, 2021, by Ivan

We are making two apple pies with two different popular crusts. A vodka-egg crust and a vodka crust. We will complement the apple pies with homemade whipped cream, and ice cream from Catton’s Creamery. This video is for first-time pie bakers like many in my family. They have already tasted these pies, so they know the final product. So bear with me as I help them bake their first apple pie.

Apple pie a luxurious dessert that anyone can make, and it is the gateway for future baking. A whole world of dishes will come into your wheelhouse like bread, donuts, pizzas, dumplings, and even pasta.

The ingredients to make your homemade apple pie are few. The cooking skill you needed to make a successful, homemade apple pie is easy to learn. The filling is par-cooked, which is partially cooked, so if your pie isn’t burnt, then your pie should pass with flying colors. All you have to do is dive into working with dough, and you will be hooked for life.

If you want to practice baking pies, then use either pie dough recipe below, and divide it into three dough balls. Each dough ball can be used to make three individual serving pies, using three-inch baking pie pans. The dough can be frozen for weeks, and one apple will suffice for a single-serve filling. But you have to start by grabbing the flour and butter. And start baking.

Why use an egg? We are using an egg to create a tart or cookie-based pie dough. An egg is composed mostly of water and it will make the dough denser like a cookie but is more suited to a fresh fruit filling. But if you want a flakier crust while using an egg, then use the egg yolk only in your pie dough. Use the vodka as a replacement for the egg white. The crust will have that tart-cookie taste without the density. Only you as a viewer of this web recipe will know this secret.

Why use vodka? Gluten won’t form in alcohol because it doesn’t hydrate the proteins in flour like water creating gluten.Gluten makes pie crust chewy, so we want to reduce the gluten. Gluten builds as we use flour and water together, and knead, the dough too much. Also, water boils at 212° Fahrenheit or 100°C, but 80-proof vodka boils at 170°Fahrenheit and leaves little if any taste. The vodka boils quickly during baking creating a lighter crust. I use vodka when making tempura. The crust is always light and airy. Vodka will help us reduce the anxiety that we all face with our first pie. And that is measuring flour. The vodka will give our pie a much greater room for error in our flour weight than if we used water.

INGREDIENTS

Egg-Vodka Pie dough (Makes a 9 inch Pie)
2 cups (240g) all-purpose flour plus more to dust (Check the proper weight for your flour)
1/2 cup (100g) granulated sugar
1/2 tsp (2.78g) sea salt or table salt
1/4 cup (59 ml) Ice cold vodka or 1/8 cup water as needed
½ cup (113grams) Ice Cold unsalted butter diced into cubes (8 Tbs = 1 stick)
plus 2-3 extra Tbs that is optional before baking
2 Large Eggs
1/2 cup (100g) granulated sugar for dusting

Vodka Pie dough Egg-Vodka Pie dough (Makes a 9 inch Pie)
(Same as Egg-Vodka dough, but no egg in the dough.)

Cinnamon Nutmeg Filling
½ cup (100g) sugar, plus extra for sprinkling
½ tsp (1.7g) ground cinnamon
½ tsp (1.1g) nutmeg
4 large apples, 2 tart (green) and 2 sweet tart (red), equal 3 lbs.
4 Tbsp (½ stick, 57g) unsalted butter

Brown Sugar Filling
½ cup (100g) Brown Sugar
4 large apples, 2 tart (green) and 2 sweet-tart (red), about 3 pounds in total
4 Tbsp (½ stick, 57g) unsalted butter

Whip Cream
1 cup (235ml) Heavy Whipping Cream
3 Tbsp (42.5g) Granulated Sugar
1/2 tsp (8.4ml) Vanilla Extract (optional)
1 Egg White Optional (Provides a marshmallow flavor)

How to make Apple Pie with an Egg-Vodka Crust

First, make sure your ingredients and tools are cold. I place all my measured ingredients and tools in the refrigerator before starting the dough.

Add the granulated sugar, salt, and one egg yolk (yellow part) to the large bowl. Mix the ingredients.

Do your best to fluff two cups of all-purpose flour. I will usually shake my flour container, then fluff the flour with a fork, a cup, or even use a wire strainer.  Remove one-quarter cup of the flour to a separate bowl. I find that even fluffed flour is heavy by the eighth cup per cup. We will use the quarter cup of flour for dusting as needed. Add the two cups of flour minus the quarter cup to the large bowl of sugar, salt, and egg yolk. Use a spatula to fold the ingredients.

Dice ½ cup cold unsalted butter into dice-size cubes. One stick of butter equals 8 tablespoons or ½ cup butter. Add the butter to the flour mixture and mix to combine.

Use a food turner and chop the butter into the flour. You also can chop the butter into the flour on your work surface. But I find chopping the butter into the flour in a large bowl is easier since I can place the bowl into the refrigerator if the butter starts to soften.

Use one hand to feel and squeeze the butter into a quarter-size shape. The quarter-coin butter shape will create flakiness in our dough. The dough should feel cold, lightly wet, and sandy. The dough will crumble if you lightly squeeze it. Drizzle in a teaspoon of ice-cold vodka to replace the egg white. Fold the mixture more with your hand, and scrape the bowl with a spatula to incorporate all the flour. Feel how just a teaspoon of vodka has changed the moisture in the dough. Lightly squeeze the flour in your hand. If 60 percent of the dough sticks together, then the dough has come together. Poke the dough shape in your hand. The dough shape should fall apart in your hand into crumbles like dry snow. That is the consistency we are looking to create.

Drizzle in another teaspoon or less of vodka if the dough is too crumbly. Fold the dough with your hand a dozen times and perform the squeeze test again, before even considering adding more vodka. The conservative use of liquids in flour and how it feels as you add liquids is where you learn to become a baker. You may think you have a large bowl of lightly wet dust in front of you, but the dough will come together. We will knead the dough. Warp in clear wrap, and refrigerate the dough. Those three processes will add moisture to the rest of the powdery dough. Keep in mind we can always add a few drops of vodka as a liquid later.

Lightly dust your work surface with a sprinkle of the quarter cup of flour you set aside earlier. Pour the crumbly dough onto your work surface. Collect all the dough and form it into a mound. Notice the clean bowl. The flour has absorbed the moisture leaving the bowl dry.

6. The toasted vegetables and spices will add deep flavor to your broth.

Use the heel of your hand and press down and away from you to kneed the dough. Use a baking scraper or a spatula to fold the dough back into a mound, then knead again. Repeat the folding, and kneading six to ten times. The dough will slowly start to solidify. If the dough is too crumbly, then add a few drops of vodka, and repeat the kneading.

The dough should start to solidify into a dough ball, which now would be about 80% coming together.  The dough will be slightly less crumbly. But the dough will still fall apart like a dry sand castle. Use the dough ball to catch all the remaining dough off your work surface, and knead the dough ball again. Roll the dough ball into a loaf shape. Divide the loaf into 60% and 40%  pieces. The 60% piece is the bottom dough crust, and the 40% is the top crust. This is what is known as double dough.

Wrap each piece in clear wrap, then press down on the dough to create a thick disk shape. Place both disks into the refrigerator for two hours, so the liquid in the dough can spread throughout the dough. This makes the dough come together further. The dough can also be frozen for up to a couple of weeks for later use. What if I used too much vodka in my dough? Your secret weapon is vodka. The vodka evaporates quickly leaving less liquid during baking. The crust will have air-pockets in the crust from the vodka and butter. The result is a very light crust. But use the vodka sparingly, and focus on the feel. The quarter cup of vodka is there so you don’t have to drizzle vodka out of a bottle. Repeat the process with the vodka dough.

Let’s make the cinnamon-nutmeg apple filling. For a 9-inch pie, you will use 3 pounds or 4 large apples. Use more than one type of apple to create different tastes in your pie. Green apples are tart, and red apples are sweet. Two green and two red apples work well in a pie.

Peel, quarter, core to remove seeds, and chop the apples into large pieces. Add the apples to a cold large bowl, then drizzle lemon juice on the cut apples to prevent the apples from browning.  Add ½ cup sugar, ½ teaspoon ground cinnamon, and ½ teaspoon nutmeg to the apples. Feel free to add more cinnamon or more nutmeg. Older spices lose their punch over time. mix everything to combine.

To a warm pan add a quarter cup (½ stick) of butter, then pour the filling into the pan. Stir the apples, and allow them to steam. Cook the apples so they are slightly soft on the outside, but firm and crunchy halfway through. The apples will tenderize further when we bake the filling in the pie. Transfer the filling to a bowl and allow it to cool. Repeat the process with the brown sugar filling.

Use wax paper to roll out the dough. The wax paper is 12 inches wide, so I cut sheets 2-feet long. Fold the wax paper in half, and you have a 12×12 inch top and bottom. Let’s start with the bottom dough.  Lightly drizzle AP flour on the inside of the wax paper. Place the bottom dough into the center of the interior of the wax paper. Drizzle flour on both sides of the bottom dough. The dough should feel cold and firm. The dough will soften quickly as we roll it flat. Cover the dough with the top sheet of the wax paper.

Place the rolling pin one-third way on the dough near you, then lightly roll the pin forward two-thirds to the other side. Lightly roll the pin back towards you keeping even pressure on the dough. Turn the dough and wax paper slightly and repeat the process. Occasionally, open the wax paper and dust the dough with flour to prevent sticking.

Gradually flatten the dough to a disk that is 1/8-inch in thickness. The disk should also extend an inch or more beyond the circumference of the top of the pie pan. Use more wax paper to roll out the dough if your dough is not centered on the wax paper. Place the dough back in the refrigerator if the dough becomes too soft because it is warm. Perform the same process with the top crust. The size of the top dough only needs to extend just an inch or less beyond the top edge of the pie pan. The pie can be assembled, or both the bottom and top crust can be refrigerated. Building a pie is always easier with cold firm rolled-out dough.

Use 1/2 teaspoon of butter to grease the pie pans. Lightly fold the bottom crust in half, and then in half again. Place the center fold corner in the middle of the buttered pie pan.

Unfold the dough. Allow the dough to drape into the pan so it covers all the surfaces. There should be excess pastry around the entire pie. Adjust the pie dough if necessary. If there isn’t enough pastry on one section, then use extra pastry to patch it from another section that has extra pastry. No one will see the patch after the filling goes in and the top crust is laid down.

Lightly press down to remove any air pockets beneath, and at the bottom edge of the pie pan. Dock the bottom of the pie crust with little slits, so the steam has a way to escape. This will prevent the bubbling of the bottom pie crust. You can also use or make a pie bird to release steam from the pie.

Fill the pie pan with one of the cooled fillings. Spoon the apples evenly into the pie shell. I like my pies level, so the top crust bakes evenly. You can add more apple filling, and create a mound, but you will need a larger piece of dough to cover the pie. A pie shield will also be required, so the center of the pie doesn’t bake faster than the edges. I like placing five or six pieces of butter on top of the apples before covering them with the top pastry.

Making a lattice for the top crust is a great way to showcase the apple pie. A lattice has a weaved look, and it helps the pie cool quickly after baking. A somewhat advantage or disadvantage is that if your lattice doesn’t look perfect, then people will know you made it. It’s a great talking point around the table. I recommend cutting a paper towel into strips and practicing the lattice. Use a length of tape to hold the first row of paper strips down. This will give you more time to cool the top dough and bottom pie in the refrigerator.

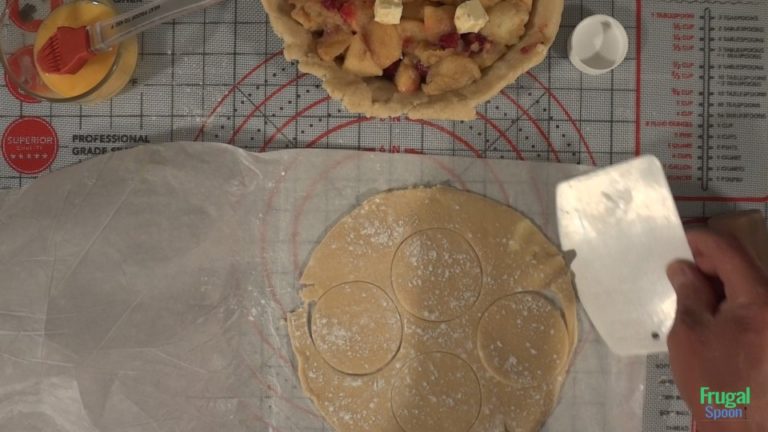
Cut the top dough into even strips.
Half-inch strips or a little larger works fine, and it doesn’t have to be super accurate.
Use a large knife or a round pizza wheel.
Avoid stretching the dough.

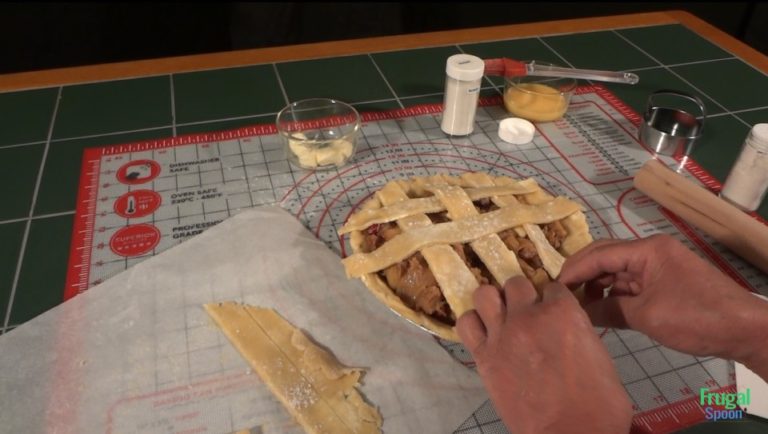
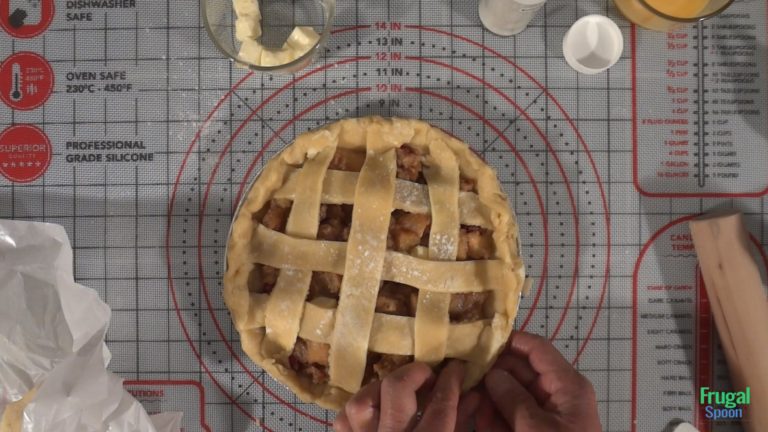
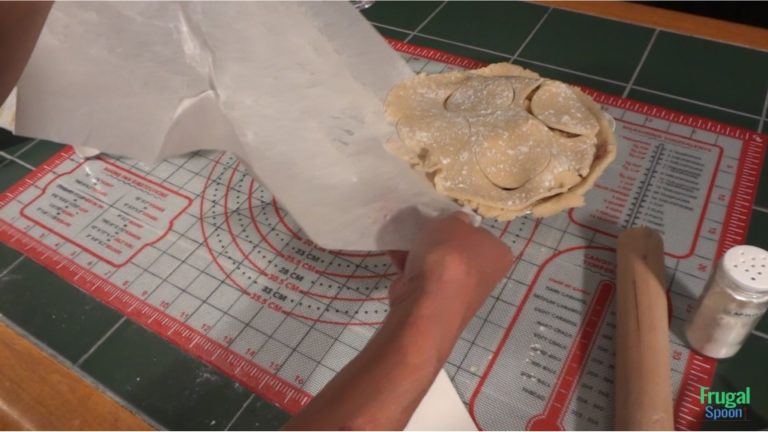
Cover the top of the pie with the strips from top to bottom.
Leave 1/2 inch gap between the strips so you can see the filling below.
We will call the strips 1-5 from top to bottom.

Fold every other strip (1,3,5,) to the right, so the fold is at the center of the pie.
Use a strip of dough that will fit down the center of the pie, but is perpendicular to all the other strips.

Fold the strips (1,3,5,) back over the new perpendicular strip.

Fold the strips (2,4) to the right.

Place another perpendicular strip to the left of the last one with a gap, so you can see the apples.
Fold the strips (2,4) back to the left and over the new perpendicular strip.

Fold the strips (1,3,5,) back to the right, and place another perpendicular piece.

Fold strips (1,3,5,) back over the new perpendicular strip.

The left side of the pie is complete.

Let’s do the right side.

Fold the strips (2,4) to the left, and place another perpendicular piece to the right.

Return strips (2,4) back to the right and over the new perpendicular strip.

Fold strips (1,3,5,) back to the left, and place another perpendicular piece.

Return strips (1,3,5) back to the right and over the new perpendicular strip.

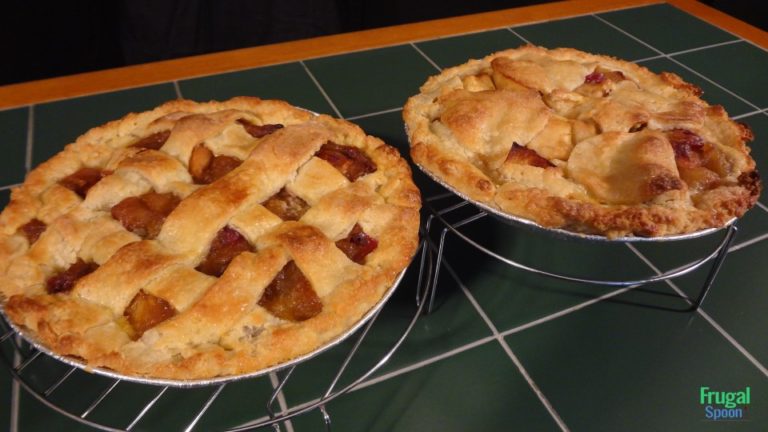
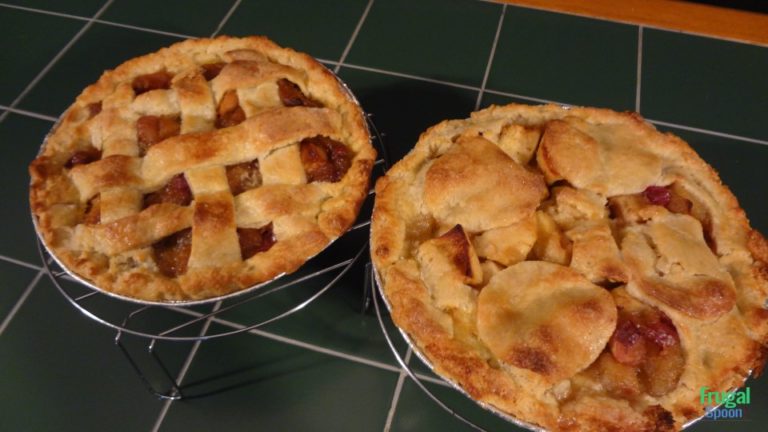
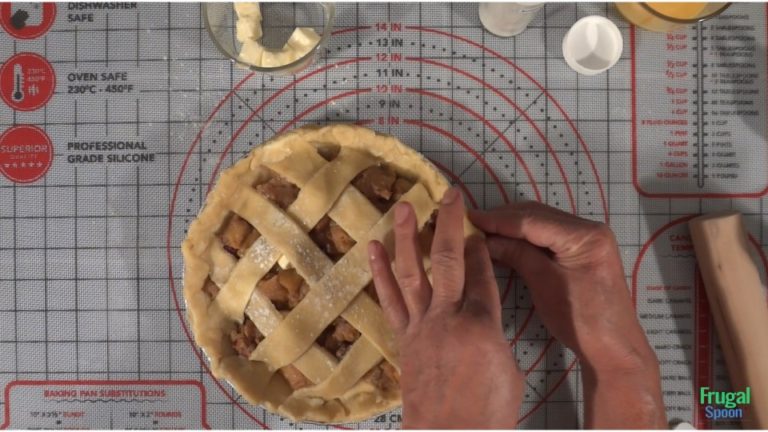
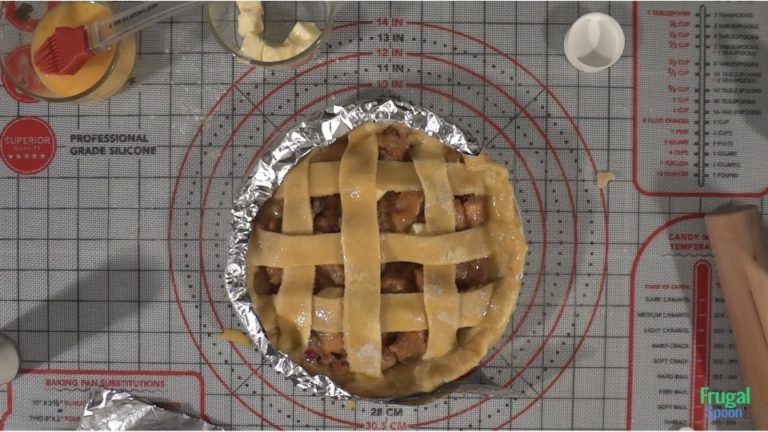
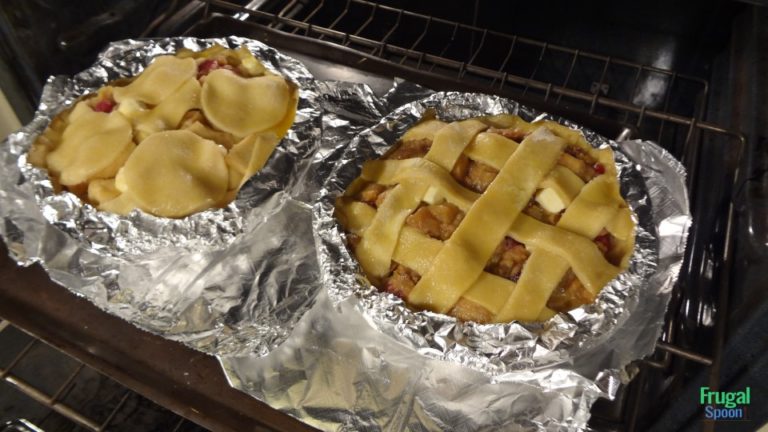
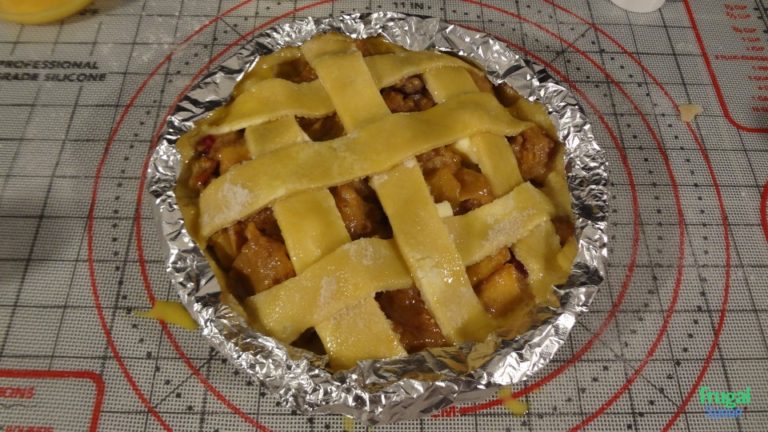
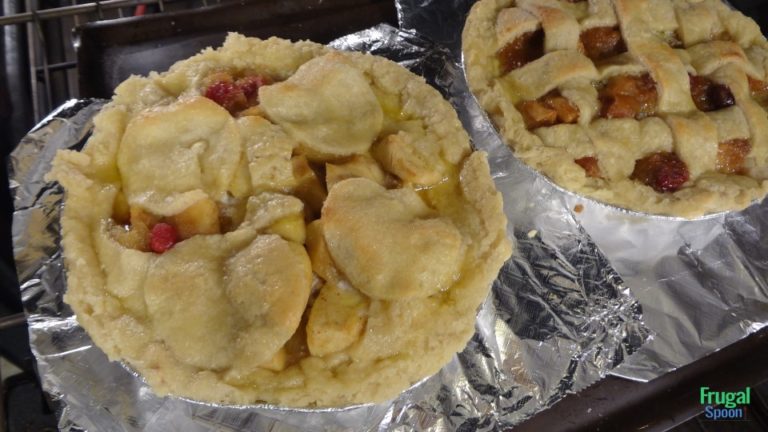
Your lattice may be complete.
Any gaps on the edges can be covered by the crust and crimping.

See Frugal Spoon Making a Pie Lattice

https://frugalspoon.com/wr0046-making-a-pie-lattice/[/embed]

Trim the top and bottom edge of the pie dough, so there is 1/2 inch extra dough beyond the edge of the pan. Fold the bottom edge of the pie dough over the top lattice edge to hide the edges of the pie strips. Find the center of your fold and fold the same distance as your first fold. The two folds will overlap. Repeat this around the pie, and move from one fold to the next. The overlaps will bind the crust together. Lightly pinch the final overlap. But you can also continue pinching around the pie for a more refined look.

Pinch the crust by placing two fingers on one side of the crust, then use your finger on your other hand to push the crust against the space between your two fingers on the other side of the crust. It will create a ruffled wave look to the crust. Brush the entire top of the pie crust with an egg wash (1 egg scrambled and 2 tsp vodka) to glaze. You don’t need to use all the egg wash. Just make sure all the exposed top crust is covered and mopped with the egg wash. The egg wash will add color and extra crunch to the top crust. Sprinkle the entire top of the pie with a generous amount of granulated sugar. A 1/8 to 1/4 cup of sugar is sufficient. Granulated sugar caramelized into a glass when it is baked, so your pie has another layer of crunch.

The rim or the edge of the pie can be higher than the rest of the pie, so burning the edge is always a possibility. I always use a pie shield on the edge of the crust. The filling in our pie is par-cooked, so my focus is on the crust. I use three-inch strips of tin foil to wrap over the edge crust. Just wrap a section of the outer crust lightly, so you don’t deform the nice ridge you created. Fold the outside bottom of the tinfoil to complete the ring, and hold it in place. Place the pie on a cookie sheet in the refrigerator, until you are ready to bake the pie.

The second or optional top crust design is what I call a crescent top. Make sure the top dough is very cold. Use a cookie cutter or a cup to cut four 2-inch holes evenly on the dough. The holes should not touch each other. Place the cut dough between the original holes. The crescent shape created will show the apples beneath. Try square shapes, or even small and large circles combined.

Dust the top of the top pie dough. Flip the wax paper with the dough to the other side. Slowly slide the dough off the wax paper onto the top of the pie. Crimp and pinch the edges like the lattice top crust. Apply the egg wash and a generous amount of sugar. Place the pie pan on a cookie sheet so it can stay cool until you are ready to bake.

The pies can be baked together or individually. I find that baking two pies in a regular oven doesn’t seem to reduce the overall cooking time.

Baking one pie involves pre-heat your oven to 375° Fahrenheit. It’s all about the crust at this point. Bake the pie for 20-25 minutes, then remove the aluminum ring or pie shield. I usually remove the pie shield when the top crust starts to turn blond a color. Allow the pie to cook for another 10-15 minutes, or until the pie is golden brown. At this point, if the pie isn’t burnt, then the pie will be awesome. Remove the pie from the oven, and allow the pie to cool for at least an hour or two. I like placing my pies on a wire rack to cool. The cooling time will allow the apples and starches to set, so the pie stays solid.

I rarely bake two pies together, because I rarely make more than one pie for me and my Plus 1. But the following was my procedure, and it worked for my pre-2000, old stove. Preheat your oven to 400° Fahrenheit. Bake the pies for 30-35 minutes, then remove the aluminum ring or pie shield when the exposed crust starts to turn a blond color.

Allow the pie to cook for another 30-35 minutes, or until the pie is golden brown.

Making homemade whipped cream is simple, and tastes better than pre-made whipped cream. I compare the difference in taste and texture to that of an expensive steak versus a cooked frozen hamburger. I often use heavy whipping cream in my sauces, pancakes, omelets, etc, so I always have a container in the refrigerator. If I don’t have milk, then I use heavy whipping cream. Many times I will use heavy whipping cream even if I have milk. Heavy whipping cream always reminds me of milk delivered in bottles with an aluminum cap. OK, I just dated myself. But that milk was the wine of wines.

The ingredients are
1 cup Heavy Whipping Cream
3 Tbs (1/4 cup) Granulated Sugar
1/2 tsp Vanilla Extract (optional)

Tools needed
1 Large Bowl
Hand mixer

Making whipping cream is like working with butter. It is best if the heavy whipping cream and tools are cold. Just pop your bowl, mixer blades, and measured sugar into the fridge for a few minutes to chill before making the whipped cream. Add 1 cup cold heavy whipping cream to the cold large bowl. One cup of heavy whipping cream will foam to almost 2-3 cups of whipped cream. Add 1/4 cup sugar, and 1/2 tsp vanilla extract.

Start the mixer blades in the whipping cream at the lowest speed. Move the bowl or the mixer so you mix everything in the bowl. As the whipped cream thickens, then slowly increase the speed of the mixer blades. Stop the hand mixer before you lift the mixer blades out of the whipped cream. Taste the whipped cream to see if you want more sugar.

Whip the cream, until you have stiff peaks. The whipped cream should stick to the mixer blades, and hold their shape without sagging.

Now we have whipped cream for our pies.

To be honest. I don’t have a sweet tooth anymore, but I do love baking pies for guests. You can’t beat the look on people’s faces when they bite into a freshly made pie with homemade whipped cream. The crust is like a very airy and delicate cookie, so slicing the pie may be a challenge.

But the crust. Everyone always eats their crust. Some people say they would eat the pie crust with no filling. Now that’s a pie crust worth giving a try.

Thanks for stopping by. I hope you enjoy your own Apple Pie. Remember to share your recipes.

Until next time. Adios…Ivan out!

Click Below to Watch the Full Video Tutorial on Youtube

All Recipes

Breakfast

Appetizers

Soups

Salads

Side Dishes

Entrees

Fair Sweets

Contact Us

Contact
Let's chat!

Need more information? Send me an email or drop me a line.